Monday, March 28, 2011

Graphic Arts Club Meeting!


Hey All!

We will have our second meeting tomorrow night at 5:00 in E118! We look forward to seeing you all there and hope that you can spread the word and continue that great attendance! We have some really awesome events coming up and we hope to see you all there!
 
Thanks!
 
James Smith
GAC President

Tuesday, March 8, 2011

Graphic Arts Club...is coming!

We are holding the first meeting to "restart" the GIT Graphic Arts Club! If you are interested in helping shape this club...provide leadership....reap the rewards....show up!

Thursday, February 24, 2011

What is Geotagging?


Geotagging is when geographical identification data is added to media such as photographs and video. This data often consists of latitude and longitude coordinates. Modern digital cameras (especially cameras in smart phones) often include this data as well as the date and time that the picture was taken. In many cases the phone user does nothing to include such ‘tagged’ data to the picture. It is simply…there.

How can it be dangerous? If geotagged pictures and video are posted online there is potential for someone to locate the location of where the picture/video was taken (your home, your school, your place of work, etc.). This can, and has, led to robbery and stalking crimes.

Most experts are not recommending that users discontinue posting pictures to their favorite social network sites like Facebook and Twitter (through Twit Pics, Tinyurl, etc.), but rather that they evaluate who they are connected to online. The key is to be connected to those that you trust.

TIPS:

-Take time to review who is on your friend list/following you and make sure that you have trusted contacts connected to your private information.

-Visit your account settings to review who can access your information online.

-Remove geotags from your photos if you want to maintain a large group of close friends as well as not-so-close friends online.

Removing Geotags:

http://www.addictivetips.com/windows-tips/remove-geotag-from-photos-to-protect-your-location/

Dangers in Posting Geotagged photos:

http://newyork.cbslocal.com/2010/11/03/geo-tagging-the-dangers-of-posting-pictures-online/

http://abclocal.go.com/wabc/video?id=7621105

Geotagging definition:

http://en.wikipedia.org/wiki/Geotagging

Angela Neria
Chief Information Officer
Pittsburg State University
1701 South Broadway
Pittsburg, KS 66762
620.235.4603
aneria@pittstate.edu
www.pittstate.edu


Image Source | CC BY 2.O | http://www.flickr.com/photos/tiseb/102133357/

Word Matrix

Note Pad Post

Planning: Word Matrix

Self-Promotion Note Pad
Serve as a leave behind piece at Career Fair, Company Day, and job interviews.

Overall goal
Demonstrate both design and production skills. Showcase either design, typography, illustration, or photography ability. Discuss the process of preparing files for output and working within a set budget and project constraints.

Call to Action
Potential employer to view my portfolio on my blog and either call or email me with a job offer.


Idea Development: Thumbnail sketches

Rough with margins and bleed indicated

Final artwork!

Project Specifications
Trims to 5 x 7 inches
1 color black | No bleed
50 sheets per pad
padding and chip board back
Cost per pad | $3
Estimated Production time | 5 days
File format provided | Packaged InDesign file or PDF with crop marks

Source | The images above were created by Caitlin Lawrence

PDF settings & Bleed


Incorrect | For your bleed to appear you have to set it in all 3 places:
  1. Native Software (Build it into photo in Photoshop or set bleed in Illustrator document settings. Artwork must extend past trim area into the bleed you set)
  2. InDesign | Document Set-Up gives you the option to indicate bleed. Bleed must extend past trim line to the red bleed line. In the image below, pink line is margin, black line is your page size or trim area, blue line indicates bleed.
3. PDF Settings | You must "check" Use Document Bleed Settings. If you do NOT check this box, #1 and #2 does not matter, you will not see your bleed in your PDF.


The image above is how your final PDF with bleed should look. Crop marks should be solid lines, set into the image.

Photoshop Formats

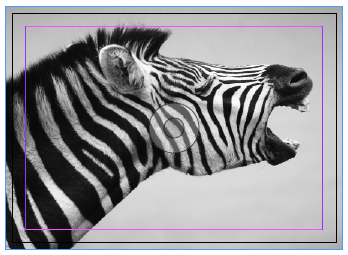
Grayscale Raster | full bleed | Save as flattened eps or tif | color mode: grayscale

Must be 300 resolution and 1/8 inch bleed should be built into your Photoshop file.
For a 6 x 4.25 inch post card cover, your PS file should measure 6.25 x 4.5 to accommodate bleed on all four sides.
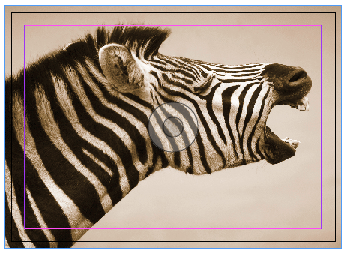
Duotone Raster | full bleed | Only save as eps | color mode: Duotone
I used PMS 116 + black for my duotone
(You must convert your image to Grayscale first, to get the Duotone option)

Must be 300 resolution and 1/8 inch bleed should be built into your Photoshop file.
For a 6 x 4.25 inch post card cover, your PS file should measure 6.25 x 4.5 to accommodate bleed on all four sides.

Four Color Raster | full bleed | Save as flattened eps or tif | color mode: CMYK

Must be 300 resolution and 1/8 inch bleed should be built into your Photoshop file.
For a 6 x 4.25 inch post card cover, your PS file should measure 6.25 x 4.5 to accommodate bleed on all four sides.
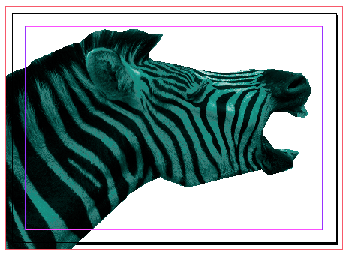
COB created using a clipping path in Photoshop | Only save as eps

Must be 300 resolution and 1/8 inch bleed should be built into your Photoshop file. A COB cannot be a full bleed, but if it bleeds of any side, you need to account for this by building it in, in PS. Your COB can be created from any of your above color modes; duotone, grayscale or cmyk.

Create a Clipping Path in Photoshop
[this step needs to be taken, when bringing an image into InDesign or Illustrator without the rest of the background. You will not see the final result in PS. It will only appear once you place the saved image into InDesign or Illustrator]
  1. Make final size adjustments (you do not want to size your photo AFTER you create your path)
  2. Draw a path using the pen tool*
  3. In the paths panel (make sure this window is open) select Save Path
  4. After you have saved the path in the same drop down select Create Clipping Path
  5. Save file as eps
If you create your path with the lasso tool, you have an extra step. In the Paths panel select "Make work path" first. Then follow the steps above.